ISD4004应用电路图:
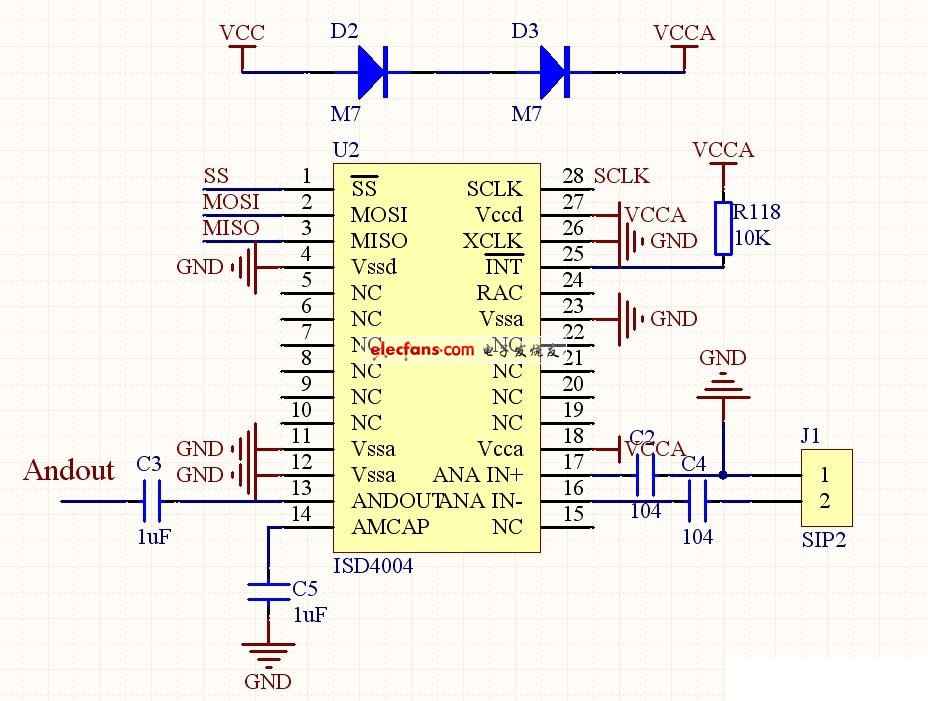
ISD4004电压是3.3V,所以本把5V的电压串联了两个二极管,这样得到的电压会是3.6伏左右,已经符合ISD4004的供电电压,这个图已经是很简化的一个图了,录音输入只采用负端单端输入方式,本人已经试过可以用。
信号放大和功率放大电路:
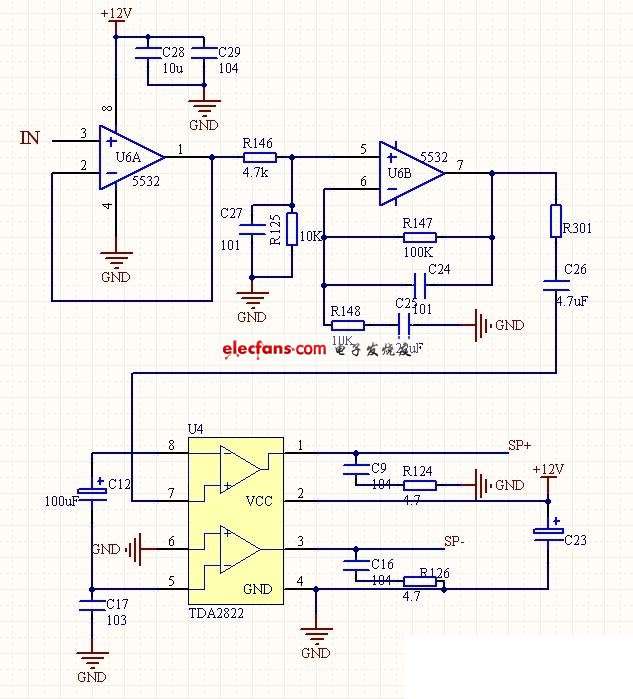
运放采用典型的运放芯片NE5532,对ISD4004信号进行跟随和放大,为后级功放提供了保障。
ISD4004驱动程序如下:
个人亲自测试并应用过,此程序肯定可以用。
#include
#include
#define uchar unsigned char
#define uint unsigned int
// ISD4004 Control bit
#define SS_1 (PORTB |= BIT(0))
#define SS_0 (PORTB &= ~BIT(0))
#define SCLK_1 (PORTB |= BIT(1))
#define SCLK_0 (PORTB &= ~BIT(1))
#define MOSI_1 (PORTB |= BIT(2))
#define MOSI_0 (PORTB &= ~BIT(2))
#define MISO_1 (PORTB |= BIT(3))
#define MISO_0 (PORTB &= ~BIT(3))
uchar temp,flag;
void delay_ms(uint i)
{
uint a,k;
for(a=0;a
void Send_Data(uint ISD4004Data)
{
uchar i;
for(i=0;i> i;
temp= temp & 0x01;
if(temp) {MOSI_1;}
else {MOSI_0;}
SCLK_0;
SCLK_1;
MOSI_0;
}
}
void PowerUp(void)
{
SS_0;
Send_Data(0x20);
SS_1;
}
void Stop(void)
{
SS_0; //先把SS拉低
Send_Data( 0x10);
SS_1; //把SS拉高,
}
void Record(uint RecAddr)
{
PowerUp();
delay_ms(50);
PowerUp();
delay_ms(100);
SS_0;
Send_Data((uchar)RecAddr);
Send_Data((uchar)(RecAddr>>8));
Send_Data(0xA0);
SS_1;
SS_0;
Send_Data(0xB0);
SS_1;
}
void Play(uint Address)
{
PowerUp();
delay_ms(50);
SS_0;
Send_Data((uchar)Address);
Send_Data((uchar)(Address>>8));
Send_Data( 0xE0);
SS_1;
SS_0;
Send_Data(0xF0);
SS_1;
}
//*************************单片机端口初始化***************************
void port_init()
{
DDRA = 0xFF;
PORTA = 0x00;
DDRB = 0xFF;
PORTB = 0xFF;
DDRC = 0x00;
PORTC = 0xFF;
PINC = 0xff;
DDRD = 0x00;
PORTD = 0xff;
}
////////////////////////
void main()
{
port_init();
while(1)
{
if(!(PIND&0x10)&&(flag==0))
{
delay_ms(5);
if(!(PIND&0x10)&&(flag==0))
{
flag = 1;
//Record(0x600);
while(!(PIND&0x10));
}
}
if(!(PIND&0x10)&&(flag == 1))
{
delay_ms(5);
if(!(PIND&0x10)&&(flag == 1))
{
flag=2;
Stop();
while(!(PIND&0x10));
}
}
if(!(PIND&0x10)&&(flag == 2))
{
delay_ms(5);
if(!(PIND&0x10)&&(flag == 2))
{
flag=0;
Play(0x600);
while(!(PIND&0x10));
}
}
}
}